How To Use Lead Tags

Written by Jenna Tighe
Updated at July 17th, 2023
- My Account
- Products & Services
- Design Studio
- Facebook Ads
- Local Presence
-
Website
CRM - Real Estate Real Estate Specific (Click here for a full list of articles) Email Marketing Automation and Integration (Click here for a full list of articles) Integrations Landing Pages Single Property Websites & Flyers Blogs Mortgage Specific (Click here for a full list of articles) Analytics IDX Search Engine Optimization (SEO) Team Marketing Automation
Table of Contents
In the Agent CRM, you can create and apply tags to your leads to track, filter, and categorize more efficiently.
Applying Tags to a Lead
- Navigate to a specific Lead's record page.
- In the Contact box, locate the TAGS field.
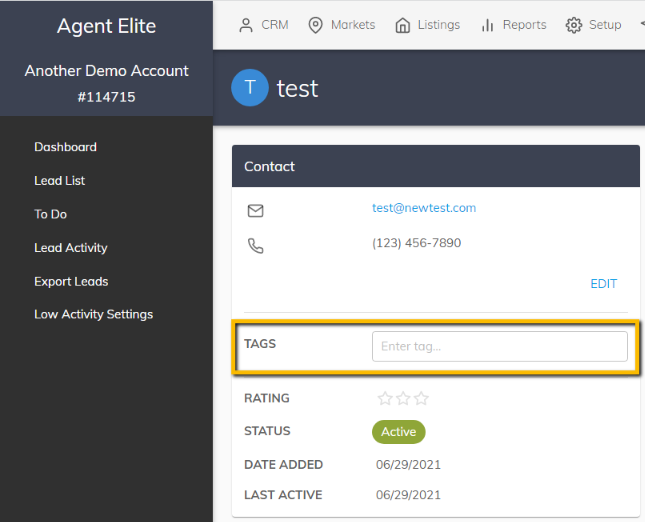
- Click in the Enter Tag field and begin typing in the tag you want to apply to the lead.
- Select a pre-existing tag from the dropdown or create a new one by typing in the desired Tag name and selecting the Create option.

- Once you apply a tag, a grey chip with that tag name appears under the TAGS field.

- You can remove a tag from a lead by clicking the "x" button next to the tag name.
Filtering/Searching Leads by Tag
You can go to the Lead List page and filter your leads based on tags.
- Navigate to the Leads List by clicking on CRM at the top of the page and selecting Lead List on the left panel.

- Click the FILTERS button in the upper right to open the Filter options.
- Select one or more tags by checking the tag checkbox on the right side of the Filter options screen. Only tags applied to 1 or more leads will appear on the Filter options screen.

- Click VIEW LEADS to see all the leads matching the selected tags.