How Do I Use the Local Presence Social Scheduler?
Learn how to use the Local Presence Social Scheduler to maximize efficiency.
- Agent Elite University
- My Account
- Agent Elite Max (CRM)
- Design Studio
- Local Presence
-
Website
Real Estate Specific (Click here for a full list of articles) Email Marketing Automation and Integration (Click here for a full list of articles) Integrations Landing Pages Single Property Websites & Flyers Blogs Mortgage Specific (Click here for a full list of articles) Analytics IDX Search Engine Optimization (SEO) Team Marketing Automation
- Facebook Ads
According to a 2022 study, social media is the second best way for real estate agents to get new leads (the first being referrals).
With an expected 80% of agents saying they plan to use social media in the next year, now is the time to get on board!
An active presence on social media will help you to build relationships with potential clients by increasing brand familiarity and building trust.
Click here for great ideas about what real estate agents can post on social media!
- New Listings
- Recently Sold Listings (even better if you include a congratulatory picture of the owners in front of their new home)
- Open Houses
- Tips for Buyers
- Local Market Area Updates
- Things to do in the neighborhood
- Great interior design shots
- Home Maintenance ideas
- Testimonials
- Community Events
- Local Businesses that you love
- Memes/Inspiration Quotes
Remember to use an image whenever possible and always respond to comments!
Here are some of the fantastic benefits of the new Local Presence social posting feature:
- You can create a social media post from your Local Presence dashboard, and have it post simultaneously across multiple platforms (Google Business Profile, Facebook, Twitter, and Instagram).
- You can view post insights, delete posts, and respond to comments in one central location.
- You can customize your posts to your real estate business by adding events such as Open Houses and CTAs.
- You can create all your posts for the month in one sitting and schedule them to post later.
*Please note - To receive the full benefit from the Social Scheduler, you must have your Local Presence connected to your Facebook Business Page and your Google Business Profile.
From your User Portal dashboard, click on Local Presence in the top Menu.

Click on Listings on the left and select Post from the dropdown.

If you have been posting to your Facebook Business Page, you will see a record of your posts here.
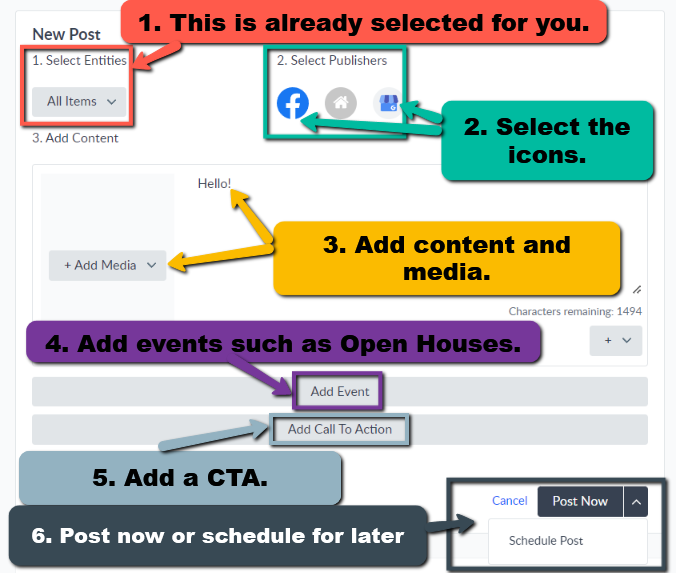
To create a new Social Post, click on +Add Post.

For your post:
- Select Entities - this is already completed. The Entity selected is your business.
- Select Publishers - click on Facebook, Google Business Page, and any other social media icons you have connected.
- Add Content - add verbiage and media content.
- Add Event - If applicable, add open house info or any other events.
- Add Call To Action - If applicable, this is a great spot to link to a Landing Page.
- Post Now or schedule for later.
