
Markets, communities and alerts
Max Basics - Creating Custom Market Reports
Section titled “Max Basics - Creating Custom Market Reports”In this video, viewers learn how to create custom markets on their websites using the Agent Elite platform. These markets allow users to send personalized market reports and saved searches to customers. The process begins by accessing the Agent Elite Performance Dashboard and navigating to the “Markets” section. If a specific market, such as Roseville, California, isn’t available, users can click “Add New” to create a new market and define the search parameters, such as homes priced between $700,000 and $800,000.
Once the filters are set, users can click “Save and Continue” and configure additional settings. It’s important to ensure that the market is displayed in the site’s navigation by checking the appropriate settings. Users also have the option to hide other agents’ open house listings in emails, though it’s generally recommended to leave this unchecked to encourage clients to explore more homes. After saving the settings, users can add a brief description for the market and upload an optional photo to enhance the listing.
After setting up the market, users can return to the “Markets” section to verify that the new market is live and ready to use. They can also view detailed listing reports, which automatically update as new properties become available or are sold. Additionally, the open houses tab shows upcoming events that can be shared with clients to spark interest.
Finally, the video emphasizes the value of the Market Report tab, which provides ongoing updates as part of follow-up campaigns. This report includes data such as median prices, sale-to-list ratios, and days on the market, helping customers stay informed. With tools like these, agents can better serve clients, whether they are residents or prospective buyers.
Where Do the Listings and Market Stats Data Come From?
The Smart Content data (listings and market stats) used in both the automated drip campaigns and email listing alerts is based on the lead’s activity.
The Info Is Pulled From the Lead’s Activity
The campaigns use the lead profile to pull the data based on the lead’s activity.
To access the lead profile, click on CRM in the top row and then click on Lead List from the left panel. Click on the lead whose activity you would like to view.

Once inside the lead profile, you will see the lead’s activity to the right of the Contact card. If there is no activity, the lead has not viewed any properties.

If the Lead Has No Activity
If the lead has no activity, the data will pull from the following three sources in this order:
1. If a lead is on a campaign but has no activity (has not viewed any properties), the smart content will show listings near the smart content default address.
You can configure this by going to Control Panel -> Communications -> Settings.

2. If no address is entered in this field, the content will use the Map Search center address (if you have Map Search in your package).
To access the Map Search address, go to Setup → Map Search (under the Search Settings dropdown).

3. If no address is entered in any of the above, it will use the My Account address.
To access, click Setup → My Account (under the Account dropdown).

Max Basics - Use the Polygon Map Search Tool
Section titled “Max Basics - Use the Polygon Map Search Tool”The Polygon map is a great alternative when you need to specify a particular area not defined in your MLS. You can easily create a market using the custom map maker.
Click on Markets at the top.

Click Add a Market.

Let’s say you want to create a market that shows only listings on the south end of Folsom Lake, but your MLS does not have that as a defined area. You can use the polygon tool to draw a custom map.
Click once on the Polygon tool icon. Your cursor will now turn into a hand icon.

Use your mouse to place the hand icon where you want the map to start. Click once, and a pin will drop at that location. This pin begins your map. You can now draw the map with your mouse icon. Clicking your mouse icon as you draw the map will allow you to create a border.
To complete the map, click on the original spot where you started your map. You will now see the map you drew and all the listings within that area.

If you want to adjust your map, click inside of it and drag and drop to where you’d like it.
After drawing your map, please give it a name and click Save.

You are now ready to connect your market to a community!
Max Basics - Add A New Community
Section titled “Max Basics - Add A New Community”- On the top menu, click on Markets and then click on Add New Market.

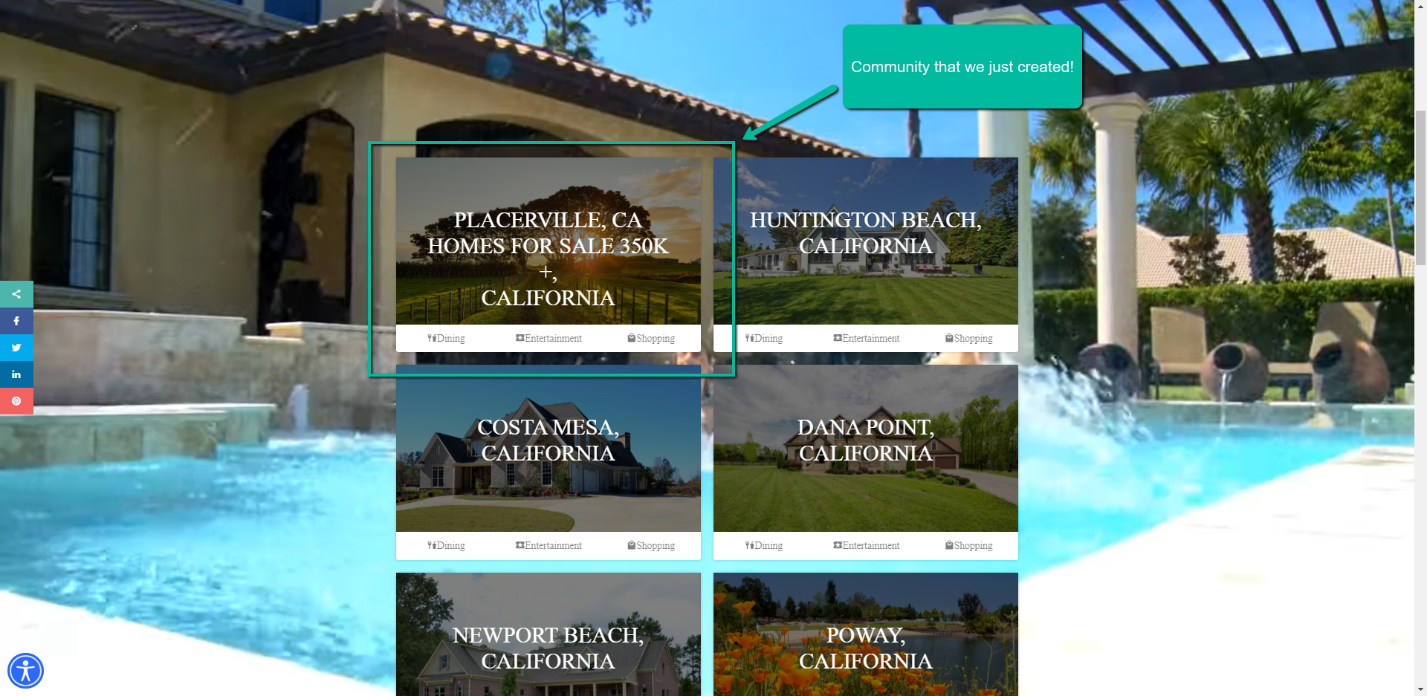
- Create your Market sheet using the criteria available. For the example below, we created a market for Placerville, CA Homes For Sale 350k+

- Once the market is created, then proceed back to the dashboard and navigate over to Communities.

Click on Add New.

- Fill out the title, community, and state. Select the hotsheet (the one we just created) and set a community image. If there are no images selected, the Community will show with a “broken” image. Click on Update/Publish to save your changes.

- Once completed, you will see the community show up on the community section.
Max Basics - Email Listing Alert Activity
Section titled “Max Basics - Email Listing Alert Activity”The Email Listing Alert Activity section displays all listing alerts to which a lead is subscribed.
Where are the listings pulled from?
Email Listing Alerts send ongoing automatic emails of properties from a Saved Search. All Email Alerts have a corresponding Saved Search in the “PROPERTY ORGANIZER” tab.
What information do the email listing alerts contain?
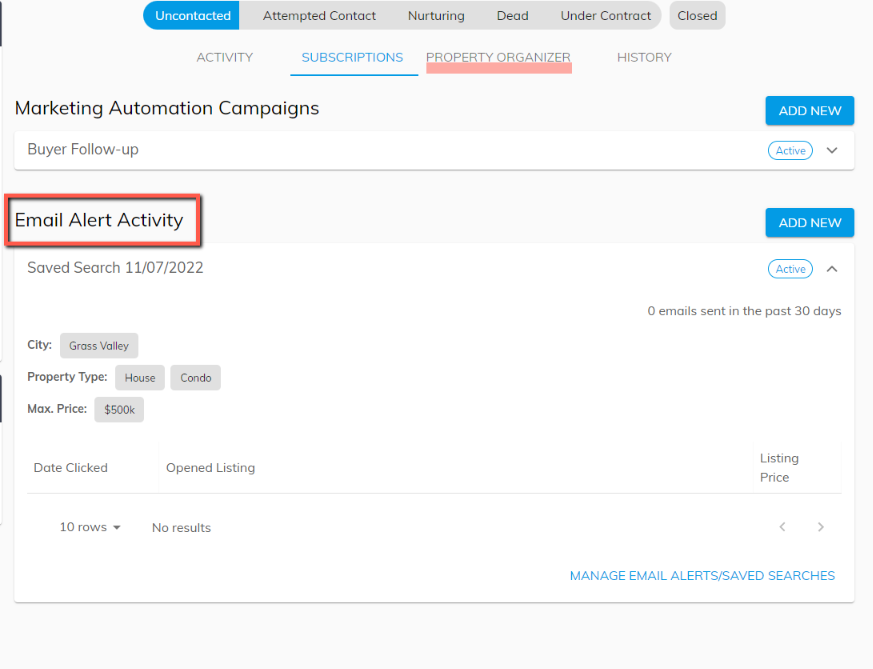
In the Email Listing Alerts Activity section, each email alert to which the lead is subscribed includes the following information:
- When the Saved Search was saved
- Whether the subscription is active or inactive
- Filtered property search criteria for the Market
- The number of Email Alert emails that have been sent to the lead in the past 30 days
- A table of click-through data for the email alert subscription
How do I access the email listing alerts?
- From your CRM, click on the name of the lead in question
- Click on Subscriptions
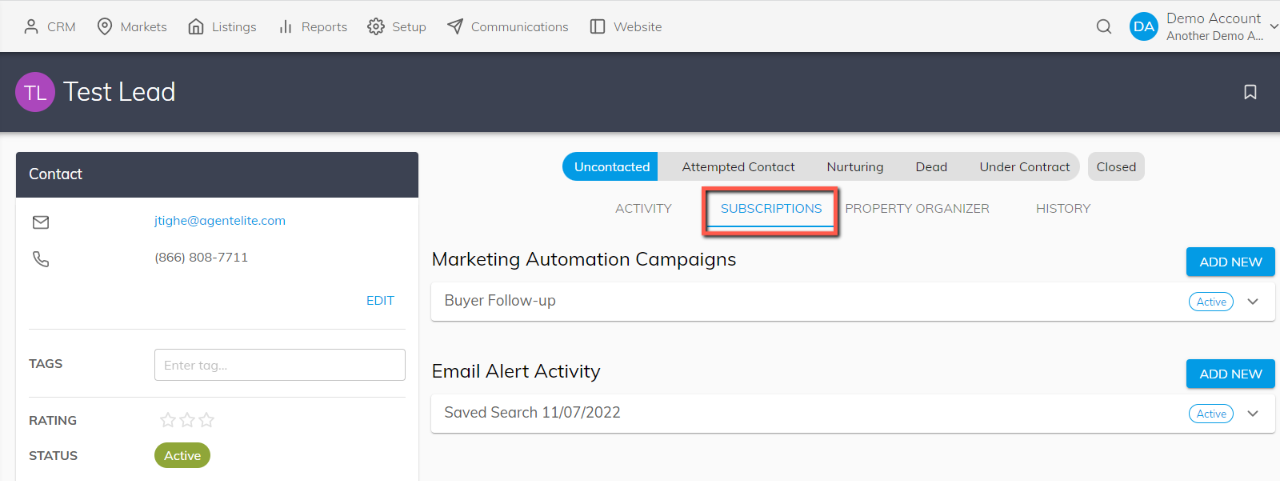
- Your client’s Email Listing Alerts are under the Email Alert Activity tab.
- Please note - All Email Listing Alerts come from a Saved Search. The client’s Saved Search will also be under Property Organizer.
Max Basics - Create a New Email Alert
Section titled “Max Basics - Create a New Email Alert”- Click the “ADD NEW” button to the right of the “Email Alert Activity” title.
- You are then directed to the PROPERTY ORGANIZER > SAVED SEARCHES. Click the “ADD NEW” button to the right.
- A property search modal will pop up. Use search filters or criteria to narrow down the property data relevant to your lead.
- Click the “Save Search” button in the upper right to save the search.
- You are then redirected back to the “SAVED SEARCHES” tab. Your saved search will appear in your results with the selected criteria and the date created.
- Activate the Email Alert by toggling on the “Email Alerts” field.
- You can now navigate to the SUBSCRIPTIONS tab, and you will see a new row under “Email Alert Activity” corresponding to the Saved Search you just made.
Max Basics - Delete or Deactivate an Email Alert
Section titled “Max Basics - Delete or Deactivate an Email Alert”- Click the “MANAGE EMAIL ALERTS/SAVED SEARCHES” link in the bottom right corner.
- You are then directed to the Saved Search corresponding to the Email Alert on the “SAVED SEARCHES” tab.
- To deactivate the Email Alerts emails from being sent, toggle the “Email Alert” to off.
- To delete the Email Alert, click the trashcan icon in the lower right of the Saved Search box.